Overview
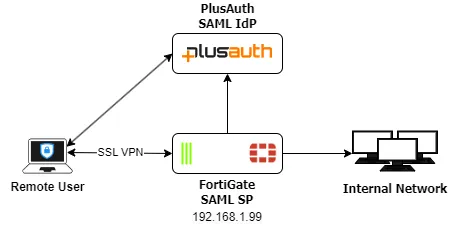
In this configuration, the FortiGate acts as a SAML service provider (SP) requesting authentication from PlusAuth, which acts as a SAML identity provider (IdP). The following shows the topology for this setup:

The authentication process is as follows in this deployment:
- The user initiates an SSL VPN request to the FortiGate.
- The FortiGate sends the browser POST redirect to FortiClient.
- FortiClient redirects the SAML authentication request to PlusAuth.
- The user authenticates with Okta using their credentials.
- PlusAuth sends a SAML assertion that contains the user and group authentication in a POST redirect to the SSL VPN login page.
- FortiClient sends the redirected PlusAuth request that contains the SAML assertion to the FortiGate.
- The FortiGate consumes the assertion and provides the user with access to resources based on the defined firewall security policy.
The example assumes that you already have a PlusAuth account. This example uses users locally defined within the PlusAuth and your plan allows SAML connections.
1. Configure PlusAuth for SSL VPN with FortiOS
- Log in to the PlusAuth dashboard as the registered user.
- Add the FortiGate application:
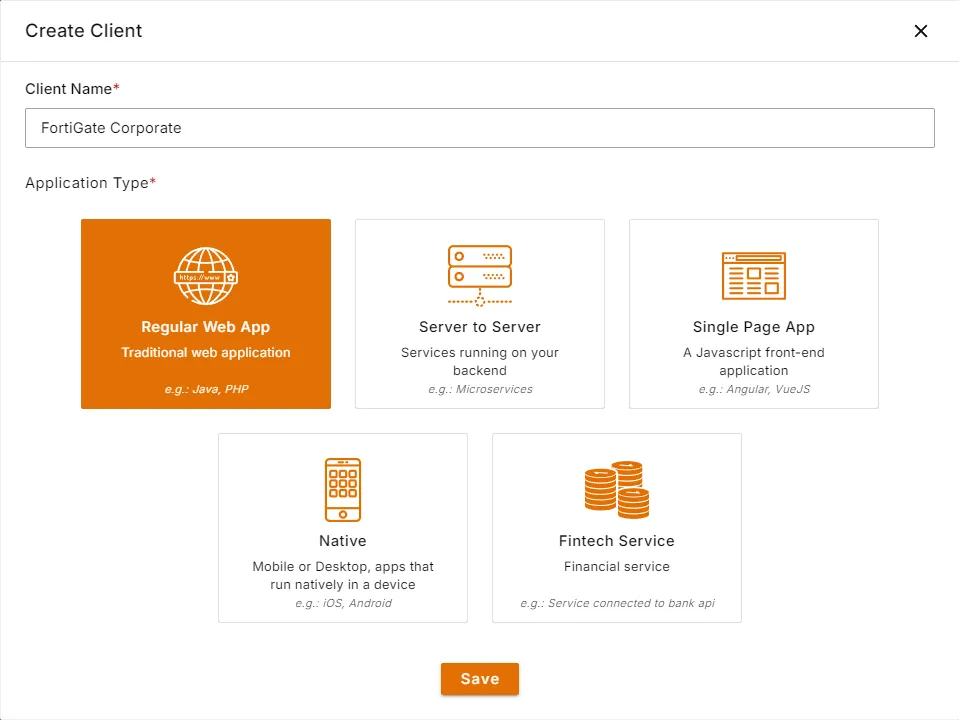
- Go to Clients and create a Regular Web App with any name by clicking Create button

- Go to Connectors tab from client details and click SAML2
- Configure SAML settings:
- In Entity ID field write down
https://<FortiGate IP address>:<port>/remote/saml/metadata/. In this example, it ishttps://192.168.1.99:10443/remote/saml/metadata/ - In the Consumer Service URL enter
https://<FortiGate IP address>:<port>/remote/saml/login/. In this example, it ishttps://192.168.1.99:10443/remote/saml/login/ - If you would like to use signed assertions upload or paste SP certificate explained in the table ove to the Signing Certificate field.
- Turn on Sign Out Enabled and enter
https://<FortiGate IP address>:<port>/remote/saml/logout/to the Sign Out Url. In this example, it ishttps://192.168.1.99:10443/remote/saml/logout/
- In Entity ID field write down
- In User Object Mapping section make sure following SAML assertions exists:With this mapping we are ensuring assigned roles to user will be available to FortiGate under"id": "http://schemas.xmlsoap.org/ws/2005/05/identity/claims/nameidentifier","email": "email","roles": "groups","username": "username"
groupsassertion. - Click to Save button to apply changes.
- Click to Metadata button and download the certificate.
- Go to Clients and create a Regular Web App with any name by clicking Create button
- Create User and Role
2. Configure FortiGate
Upload the certificate downloaded from client metadata to FortiGate
Go To System > Certificates
Click to Create/Import > Remote Certificate
Upload the certificate and click to OK. The uploaded certificate name will be assigned automatically by Fortigate. In this example, it is
REMOTE_Cert_1Configure the FortiGate SP to be a SAML user:
config user saml edit "plusauth-idp" set entity-id "https://192.168.1.99:10443/remote/saml/metadata/" set single-sign-on-url "https://192.168.1.99:10443/remote/saml/login" set single-logout-url "https://192.168.1.99:10443/remote/saml/logout" # You can see these values from the SAML Connector settings page by clicking Metadata button set idp-entity-id "urn:forti.plusauth.com:saml:<PlusAuth Client Id>" set idp-single-sign-on-url "https://fortinet.plusauth.com/p/saml/<PlusAuth Client Id>/signin" set idp-single-logout-url "https://fortinet.plusauth.com/p/saml/<PlusAuth Client Id>/logout" set idp-cert "REMOTE_Cert_1" # If you would like to use username field replace the value according to your mappings set user-name "email" set group-name "groups" nextend- Configure user group assertion on PlusAUth as part of the SAML assertion attributes. It is important that the group attribute value received is locally matched with the
group-namevalue:
config user group edit "corporate-saml" set member "plusauth-idp" config match edit 1 set server-name "plusauth-idp" ## Notice that the group name must be the same with the created PlusAuth role. set group-name "corporate-role" next end nextend- Go to VPN > SSL-VPN Settings. Configure VPN settings as desired. In this example the port
10443is used. If you wish to use different port, change the related configurations accordingly. When testing the VPN solution, starting with a web-based configuration, then moving to a tunnel-based configuration is recommended. Web-based testing can help in troubleshooting. - Go to Policy and Objects > Firewall Policies. Configure a policy as desired.
- Increase the global authentication timeout period to allow users to fill in their credentials in time. The default timeout is five seconds:
config system global set remoteauthtimeout 120end 3. End Result
Troubleshooting Tips
Enable debugging for 'SAML'
diagnose debug console timestamp enablediagnose debug application samld -1diagnose debug enableTo disable debug:
diagnose debug application samld 0diagnose debug disablediagnose debug resetEnable debugging for 'SSL VPN':
diagnose debug console timestamp enablediagnose debug application sslvpn -1diagnose debug enableTo disable debug:
diagnose debug application sslvpn 0diagnose debug disablediagnose debug resetList current SSL VPN connections
execute vpn sslvpn listCheck SAML metadata
diagnose vpn ssl saml-metadata "Your_SAML" <----- For SSL VPN.# diagnose sys saml metadata <----- For admin access.