In this article, you learn how to integrate Palo Alto Networks - GlobalProtect with PlusAuth using RADIUS protocol. When you integrate Palo Alto Networks - GlobalProtect with PlusAuth, you can:
- Control in PlusAuth who has access to Palo Alto Networks - GlobalProtect.
- Allow using PlusAuth features, such as MFA and External Connections.
- Manage your accounts in one central location.
Enable RADIUS in PlusAuth
Go to Dashboard > Authentication > RADIUS and enable RADIUS from the switch in the upper right of the page. After you save, your RADIUS server will be ready to use and the secret required for integrations will be displayed in Secret text box.
For more information about configuring the RADIUS in PlusAuth, have a look at RADIUS documentation
Integrating RADIUS Authentication with Palo Alto GlobalProtect
The integration involves configuring a service route for RADIUS traffic, defining the RADIUS server profile, creating an authentication profile, and finally applying this authentication profile to your GlobalProtect Portal and Gateway.
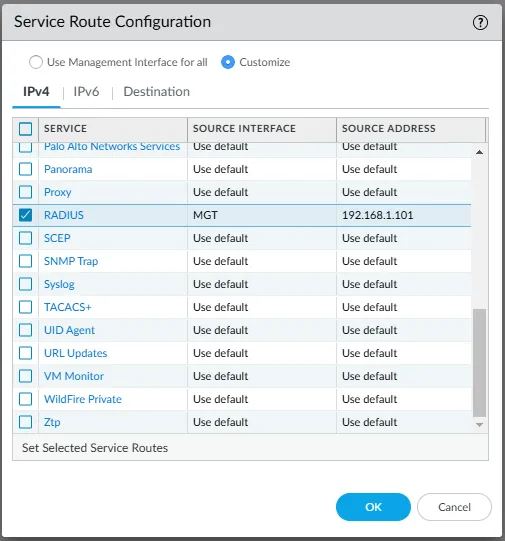
1. Configure Service Route for RADIUS
It's crucial to ensure the firewall can communicate with the PlusAuth RADIUS server. If your PlusAuth installation is reachable via a non-management interface, or if you need to specify a source IP address for RADIUS communication, you may need to configure a custom service route.
- Navigate to Device > Setup > Services.
- In the Service Route Configuration section, select Customize.
- Locate and select RADIUS from the service list.
- Choose the appropriate Source Interface from which the firewall will send RADIUS requests (e.g., MGT, or a specific data plane interface).
- Specify the Source Address that the firewall will use for RADIUS packets originating from the selected interface.
- Click OK.
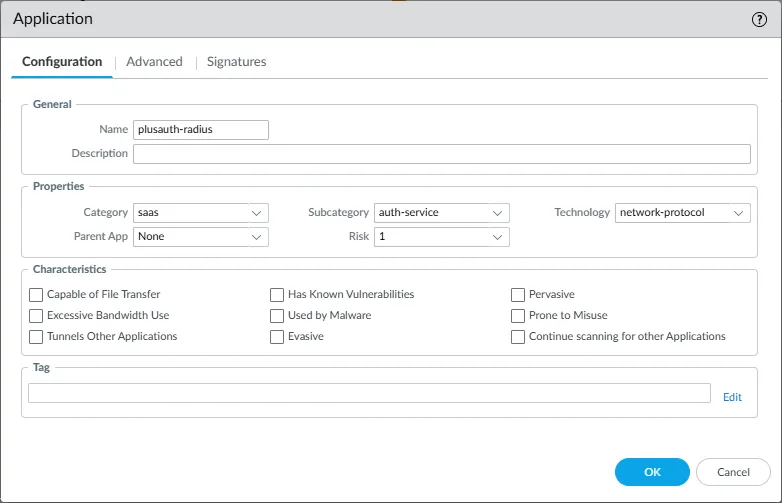
2. Create a Custom Application for RADIUS (Optional but Recommended)
If you wish to have a more granular definition for PlusAuth RADIUS traffic, you should create a custom application as the predefined radius application object uses UDP 1812/1813 or 1645/1646 ports. Some RADIUS clients may not resolve domain names, therefore they should access to RADIUS server through the IP address. To overcome this issue and being a multi-tenant solution, PlusAuth assigns different ports to each tenant's RADIUS server.
- Navigate to Objects > Applications.
- Click Add to create a new application.
- On the Configuration tab:
- Name: Enter a descriptive name (e.g.,
plusauth-radius). - Category: Select
saas. - Subcategory: Select
auth-service. - Technology: Select
network-protocol.
- Name: Enter a descriptive name (e.g.,
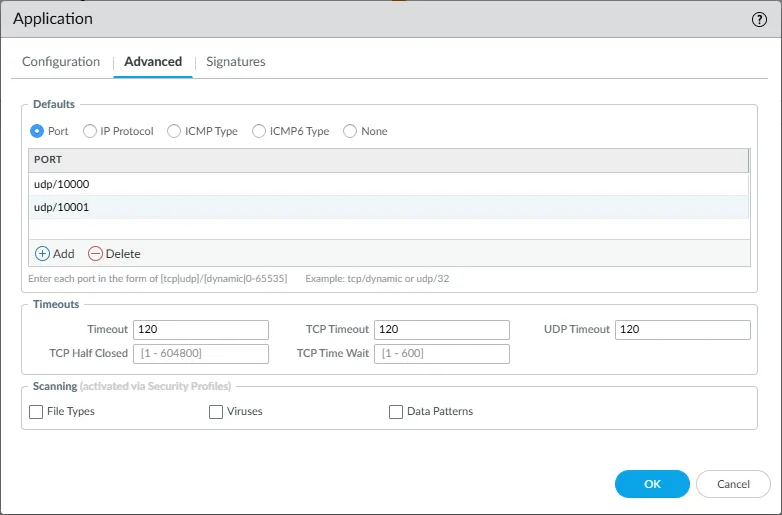
- Switch to the Advanced tab:
- Select Port.
- Click Add and enter the UDP port(s) used by your RADIUS server(s) (e.g.,
udp/10000). - Set Timeout, TCP Timeout, and UDP Timeout values as needed (e.g.,
120seconds for each).
- Click OK.
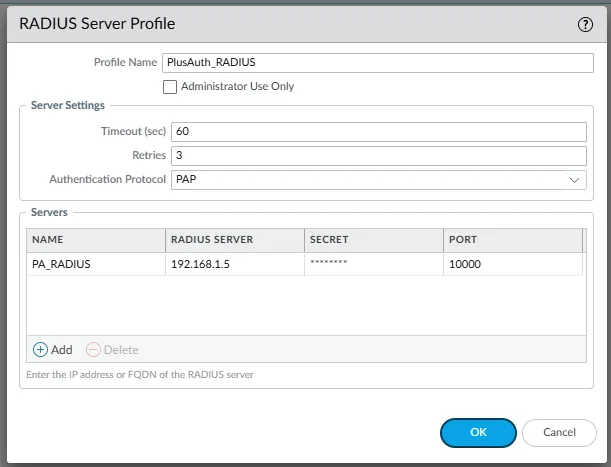
3. Configure RADIUS Server Profile
This profile contains the specific details for connecting to your RADIUS server.
- Navigate to Device > Server Profiles > RADIUS.
- Click Add to create a new RADIUS server profile.
- Enter a Profile Name (e.g.,
PlusAuth_RADIUS). - Under Server Settings:
- Set the Timeout (sec) value. This is the time the firewall will wait for a response from the RADIUS server ( e.g.,
60seconds). - Set the number of Retries the firewall will attempt if no response is received (e.g.,
3). - Select
PAPfor the Authentication Protocol.
- Set the Timeout (sec) value. This is the time the firewall will wait for a response from the RADIUS server ( e.g.,
- Under Servers, click Add.
- Name: Enter a name for the server entry (e.g.,
PA_RADIUS). - RADIUS SERVER: Enter the IP address your PlusAuth instance (e.g.,
192.168.1.5). - SECRET: Enter the secret displayed in PlusAuth RADIUS page.
- PORT: Enter the port number displayed in PlusAuth RADIUS page (e.g.,
10000).
- Name: Enter a name for the server entry (e.g.,
- Click OK to save the server entry.
- Click OK to save the RADIUS Server Profile.
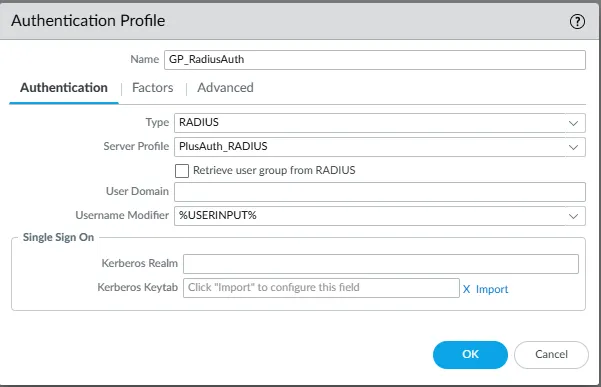
4. Configure Authentication Profile
The Authentication Profile links the GlobalProtect configuration to the RADIUS server profile you just created.
- Navigate to Device > Authentication Profile.
- Click Add to create a new authentication profile.
- On the Authentication tab:
- Name: Enter a descriptive name (e.g.,
GP_RadiusAuth). - Type: Select
RADIUSfrom the dropdown menu. - Server Profile: Select the RADIUS server profile created in the previous step (e.g.,
PlusAuth_RADIUS). - Username Modifier: Choose how usernames entered by users will be processed.
%USERINPUT%sends the username as entered.
- Name: Enter a descriptive name (e.g.,
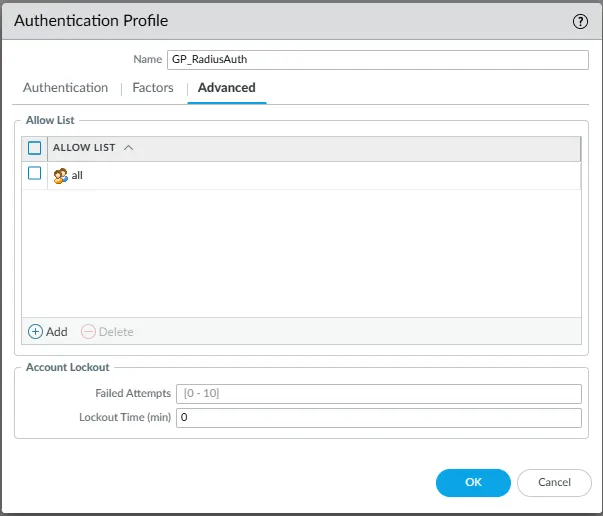
- Switch to the Advanced tab.
- Under Allow List, click Add and select the user groups that are permitted to authenticate using this profile (e.g.,
all, or specific groups defined on the firewall). - Configure Account Lockout settings if desired.
- Click OK.
5. Assign Authentication Profile to GlobalProtect Portal
Configure the GlobalProtect Portal to use the new RADIUS-based authentication profile.
- Navigate to Network > GlobalProtect > Portals.
- Select your GlobalProtect Portal configuration.
- Go to the Authentication tab.
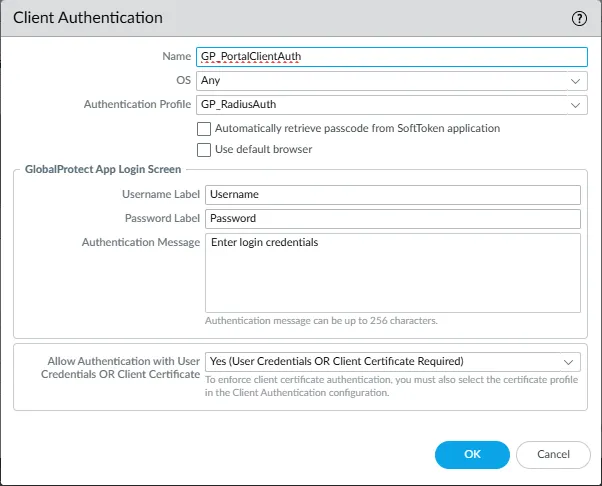
- Under Client Authentication, click Add or modify an existing client authentication sequence.
- Name: Enter a name for this authentication configuration (e.g.,
GP_PortalClientAuth). - OS: Select the client operating systems this authentication profile applies to, or choose
Any. - Authentication Profile: Select the Authentication Profile created earlier (e.g.,
GP_RadiusAuth). - GlobalProtect App Login Screen: Customize the labels and message displayed to users if needed:
- Username Label: (e.g.,
Username) - Password Label: (e.g.,
Password) - Authentication Message: (e.g.,
Enter login credentials)
- Username Label: (e.g.,
- Name: Enter a name for this authentication configuration (e.g.,
- Configure Allow Authentication with User Credentials OR Client Certificate to be
Yes (User Credentials OR Client Certificate Required). - Click OK to save the client authentication settings.
- Click OK to save the Portal configuration.
6. Assign Authentication Profile to GlobalProtect Gateway
Configure the GlobalProtect Gateway to use the same RADIUS-based authentication profile.
- Navigate to Network > GlobalProtect > Gateways.
- Select your GlobalProtect Gateway configuration.
- Go to the Authentication tab.
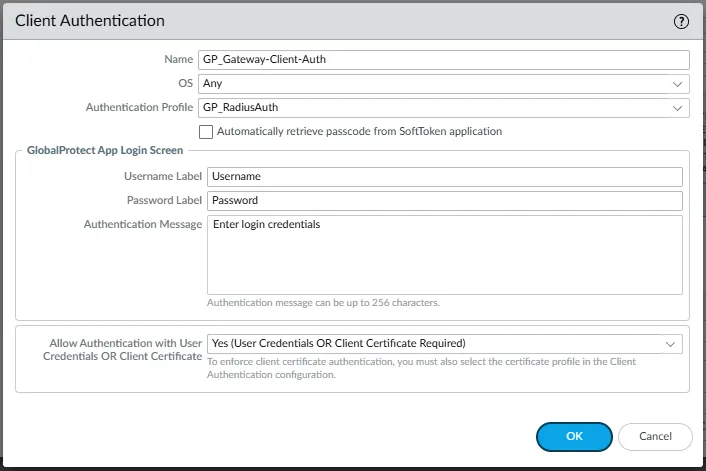
- Under Client Authentication, click Add or modify an existing client authentication sequence.
- Name: Enter a name for this authentication configuration (e.g.,
GP_Gateway-Client-Auth). - OS: Select the client operating systems this authentication profile applies to, or choose
Any. - Authentication Profile: Select the Authentication Profile created earlier (e.g.,
GP_RadiusAuth). - GlobalProtect App Login Screen: Customize the labels and message displayed to users if needed:
- Username Label: (e.g.,
Username) - Password Label: (e.g.,
Password) - Authentication Message: (e.g.,
Enter login credentials)
- Username Label: (e.g.,
- Name: Enter a name for this authentication configuration (e.g.,
- Configure Allow Authentication with User Credentials OR Client Certificate to be
Yes (User Credentials OR Client Certificate Required). - Click OK to save the client authentication settings.
- Click OK to save the Gateway configuration.
7. Commit Changes
After completing all configuration steps, commit the changes to the firewall for them to take effect.
- Click Commit in the top right corner of the firewall's web interface.
- Review the changes and click Commit again.
Verification
After committing the changes, test the GlobalProtect VPN connection using a client device. Users should now be prompted for their credentials, which will be authenticated against the configured RADIUS server.
Check the firewall's system logs (Monitor > Logs > System) and traffic logs for any RADIUS or GlobalProtect related messages to troubleshoot if necessary. Ensure your PlusAuth shows successful authentication attempts from Dashboard > Logs.